
There’s a special kind of magic that happens when you cure salmon at home. You start with a simple slab of fish, a handful of ingredients, and a little patience – and end up with silky, fragrant gin-cured gravlax bursting with Nordic charm. While the classic Gravlax remains a staple of Nordic cuisine, this Gin Cured version introduces a botanical elegance that elevates the traditional curing process. In this guide, we’ll walk through every step of making professional-quality gin gravlax in your own kitchen. Cozy up and let’s dive into this Scandinavian delight, complete with a full recipe (dual measurements), tips, and a troubleshooting FAQ.
A Scandinavian Classic with a Twist of Gin
Gravlax (or gravad lax) is a traditional Scandinavian dish of salmon cured with salt, sugar, and dill. In fact, the name gravlax comes from Swedish words meaning “buried salmon” – harkening back to medieval times when fishermen would salt the salmon and literally bury it in the ground to preserve it. Thankfully, modern gravlax is a lot more appetizing (and far less muddy)! The curing process draws out moisture and infuses the fish with seasoning, transforming raw salmon into a luscious delicacy akin to smoked salmon (minus the smoke). Thin slices of gravlax have a velvety texture and delicate, sweet-savory flavor with hints of fresh dill and spice.
So why gin? Traditionally, Scandinavian cures sometimes include a splash of spirits like vodka or aquavit (a caraway-scented Nordic spirit) for flavor. Gin is a natural twist – its botanical notes of juniper, citrus, and herbs beautifully complement the salmon. Imagine the subtle piney aroma of juniper berries (the same flavor that defines gin) mingling with dill and rich salmon – it’s a match made in heaven (or Valhalla). Gin-cured salmon has all the classic gravlax charm, with an extra layer of aromatic flavor from the gin’s botanicals. And don’t worry: it won’t taste like a cocktail, and most of the alcohol itself won’t remain after curing. Instead, you get a gentle infusion of botanicals that elevates the fish.

Ingredients for Gin-Cured Salmon (Gravlax)
The ingredient list is short and simple, but each component plays an important role. Here’s what you’ll need:
Fresh Salmon
Choose a high-quality salmon fillet, about 2 pounds (900 g to 1 kg). Skin-on is common (it holds the fish together during curing and makes slicing easier), and make sure all the pin bones are removed.
Wild-caught salmon has wonderful flavor, while good farmed Atlantic salmon is buttery and works well too. If using wild salmon (or any salmon you’re not confident has been previously frozen), see the safety notes below about freezing. The fish should smell clean and ocean-fresh, with no “fishy” odor.
Salt
Curing requires a good amount of salt – use a coarse, non-iodized salt like kosher salt or coarse sea salt. Fine table salt is not recommended (it can make the gravlax too salty and has additives). Salt is key for drawing out moisture and preserving the fish, so don’t skimp on it.
Sugar
Granulated white sugar is traditional, but you can use brown sugar for a richer flavor if desired. Sugar balances the saltiness and helps give the salmon a silky texture. We’ll use equal parts sugar and salt in the cure.
Gin
Use any good gin you enjoy – about 1/4 to 1/3 cup (60–80 ml). A classic London Dry gin works great, or try an herbaceous gin with citrus or floral notes if you like. There’s no need for expensive top-shelf gin here, but since its flavor will infuse the fish, choose a gin with a flavor profile you love.
The alcohol also helps the seasoning penetrate and “cooks” the fish slightly during curing.
Fresh Dill
A big handful of fresh dill fronds is classic for gravlax and pairs beautifully with gin’s juniper. Dill imparts a sweet, herbal note that is basically the signature gravlax flavor. Use the fresh dill leaves (feathery fronds); you can save the thick stems for another use (or include a few in the cure for extra aroma, then discard later).
If you’re not a dill fan, see the Variations section below for other flavor ideas.
Spices
This is where you can customize. Traditional gravlax often includes a little white pepper. We’ll use coarsely crushed peppercorns (white or black) for a gentle kick. Also, since we’re highlighting gin’s botanical vibe, crushed juniper berries are a fantastic addition – they reinforce that piney gin aroma. A teaspoon of juniper berries (lightly crushed) and a teaspoon of peppercorns will do.
Other great options are coriander seeds or fennel seeds (common in some gravlax recipes). Feel free to experiment, but at minimum use the salt, sugar, dill, and pepper, with gin as the star twist.
Equipment
You don’t need any special equipment, but prepare a few items: plastic wrap or large zip-top bags, a baking dish or tray that will fit the salmon, and something to weigh the fish down (such as canned goods or a heavy skillet).
Weighing the salmon helps press out moisture for a firmer texture. You’ll also need a sharp long knife for slicing the finished gravlax paper-thin.
Optional but useful: kitchen tweezers (to remove pin bones) and a mortar & pestle or spice grinder (to crack the peppercorns and juniper).

Mastering the Cure: Professional Techniques
While the recipe card gives you the roadmap, these techniques are what separate a “salty fish” from a “professional-grade gravlax.”
1. The Power of the Press
Applying weight is the secret to the dense, velvety texture found in high-end gourmet shops.
- Moisture Extraction: A heavy weight, such as a cast-iron skillet or foil-wrapped brick, forces moisture out of the fish.
- Texture Transformation: This pressure transforms the salmon from a soft, raw state into a firm, sliceable delicacy.
- Enhanced Penetration: Using a weight helps the salt and sugar cure penetrate the thicker parts of the fillet more effectively.
2. The “Sandwich” Strategy
If you have a large fillet or multiple pieces, stacking them can improve the consistency of the cure.
- Flesh-to-Flesh: Stacking two fillets flesh-side together with the cure in the middle helps the salmon season evenly from both sides.
- Structural Integrity: Keeping the skin on during this process helps hold the fish together and makes the final slicing much easier.
3. The “Magnus Nilsson” Mid-Cure Refresh
For a perfectly balanced flavor that isn’t overly harsh on the surface, consider this advanced step approximately 24 hours into the process.
- Drain and Scrape: Pour off the accumulated brine and gently scrape away the old, spent cure and dill.
- Redistribution: Re-wrap the salmon in fresh plastic with fresh dill and a small splash of gin to allow the internal salt to redistribute evenly.
- Salinity Control: This prevents the outer layers from becoming salt-saturated while the center finishes curing.
4. Anatomy of the Perfect Slice
Your presentation is defined by your knife skills and the temperature of the fish.
- The 45-Degree Rule: Hold a sharp, long knife at a shallow angle to produce long, translucent slices rather than thick chunks.
- Cold is Gold: Slicing is significantly easier when the salmon is very cold or even slightly semi-frozen, as the flesh is firmer.
- The Gray Layer: You may slice off and discard the thin, grayish surface layer if it is too salty or aesthetically unpleasing.
5. The Salt Grain Factor
The type of salt you use is the most important chemical variable in your cure.
- Coarse is Mandatory: Always use coarse non-iodized salt, such as kosher or sea salt, which draws out moisture at a controlled rate.
- Avoid Fine Salt: Table salt is too dense; it dissolves too quickly and can easily over-salt the fish.
6. Strategic Trimming
For the most even cure, look at the anatomy of your fillet before you begin.
- Uniformity: Avoid using very thin tail pieces, as they cure much faster than the center-cut and can become unpleasantly dry and salty.
- Consistency: Use thick center-cut fillets to ensure the cure time results in a uniform texture across the entire piece.
7. Botanical Infusion
The gin does more than just add flavor; it acts as a curing agent.
- Aromatic Penetration: The alcohol helps the botanical flavors of juniper and dill penetrate deep into the flesh.
- The “Daily Splash”: For gin lovers, adding an extra tablespoon of gin over the fish each day during the flipping process refreshes the aromatic botanical profile.
8. Picking the right gin
A bold, juniper-forward gin (like a classic London Dry) will impart the most flavor. Navy-strength gins (higher proof) can be used for extra punch, but any 80-proof (40% ABV) gin works fine. Feel free to use a gin with complementary flavors – e.g., citrus-infused gin for a lemony twist, or an herb-infused gin to play up the dill. Sloe gin (a sweet gin liqueur) can be used too, but reduce the sugar in the cure slightly in that case.
Serving Suggestions
One of the joys of gravlax is how versatile it is. In Scandinavia, gravlax is often served simply: draped on dark rye bread or crispbread, with a dollop of hovmästarsås (a creamy mustard-dill sauce) on the side. The combination of silky cured salmon, fresh dill, and sweet-tangy mustard sauce is chef’s kiss delicious. You can easily whip up a quick mustard sauce for authenticity (click here for recipe).
For the ultimate Nordic lunch, layer it onto a slice of buttered rugbrød for a classic Danish smørrebrød — our Modern Midnight Sun combination pairs this gin gravlax with shaved cucumber, lemon-dill mayo, and a jammy soft-boiled egg for something truly special.
For a brunch board or bagel spread, gin gravlax is absolutely stellar. Pair it with cream cheese, capers, thinly sliced red onion, and maybe some cucumber. In fact, this gin-cured salmon makes an epic bagel topping – a sort of Nordic-meets-New-York treat that will elevate your next Sunday brunch. Try it on a toasted bagel (or warm brioche) with a smear of cream cheese, a few capers, red onion, and a sprinkle of dill on top. It’s like lox and bagels, but with a botanical twist!
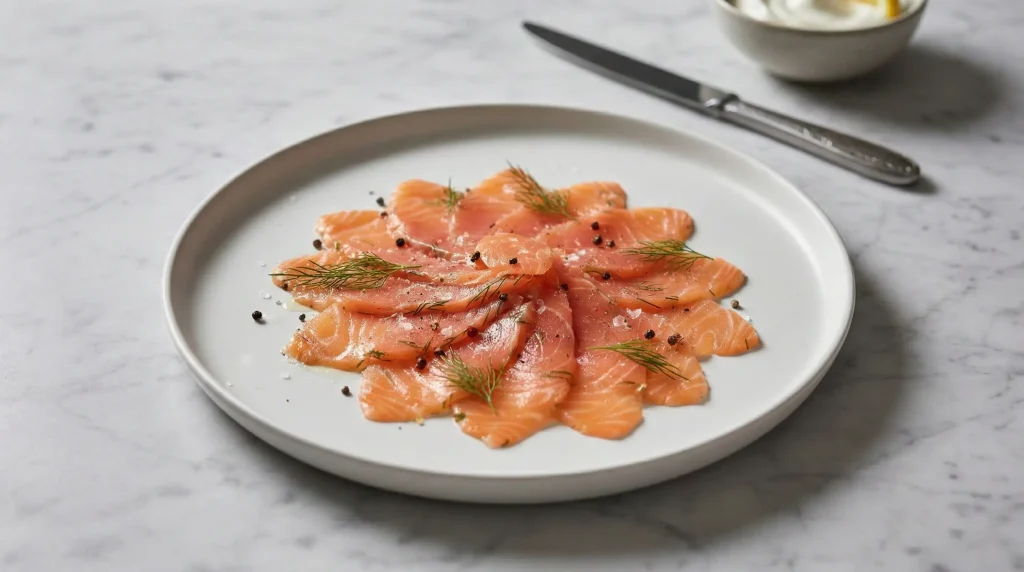
For an elegant appetizer, serve gravlax on cucumber rounds or crackers with a dab of crème fraîche, or rolled up into bite-sized rosettes. You can also lay slices on a platter with lemon wedges and additional fresh dill for garnish – let everyone help themselves. A squeeze of lemon over the fish just before eating brightens the flavors nicely.
Don’t forget the drinks: given the gin theme, a glass of bubbly or a gin cocktail (like a French 75 or a simple gin & tonic) pairs wonderfully. Or keep it Scandinavian and serve with cold aquavit or vodka shots – skål!
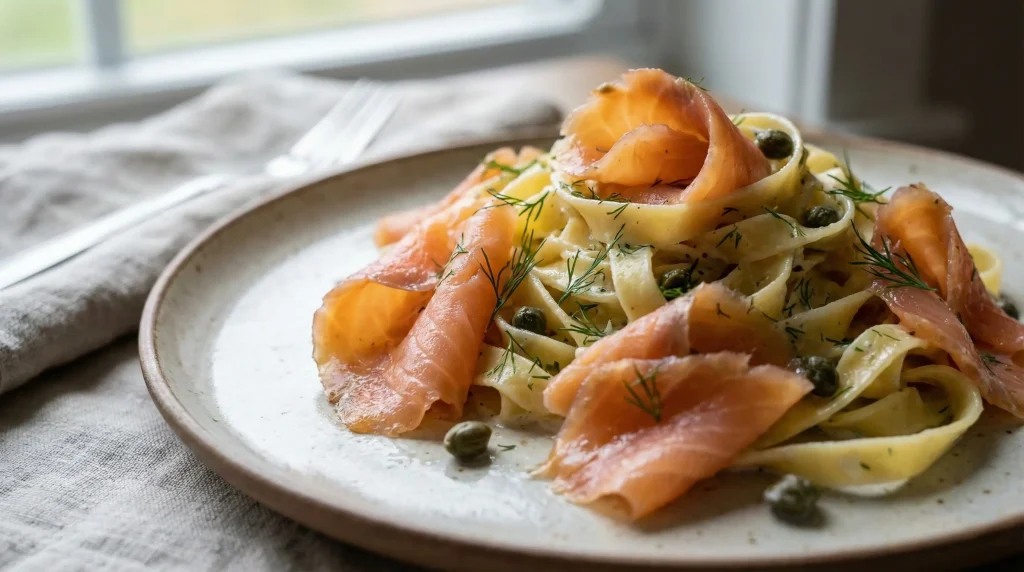
And if by some miracle you have leftovers, turn them into laxröra. This creamy Swedish salmon salad—chopped gravlax mixed with mayonnaise, crème fraîche, and herbs—is fantastic on toast or stuffed into a baked potato. You can also toss the chopped fish into scrambled eggs, salads, or use it in a seafood quiche, pizza, or pasta. (But honestly, it tends to disappear fast because it’s so tasty.)
Storage
Once cured and sliced, gravlax will keep in the refrigerator for about 5-7 days if stored properly (wrap it tightly in plastic wrap or in an airtight container). Keep it cold and don’t leave it sitting out for more than a couple hours when serving, especially in warm conditions.
For longer storage, you can freeze gravlax: wrap slices in plastic wrap and foil, or vacuum-seal them, and freeze for up to 2 months. Thaw in the fridge when ready to enjoy. (Do note, if your salmon was previously frozen, it’s best not to refreeze the finished gravlax as the texture can suffer.)
Now, ready for the full recipe with exact ingredients? Let’s get curing!
Gin-Cured Salmon (Gin Gravlax)
Ingredients
Method
- Check the salmon fillet for any pin bones and remove them.
- Pat the salmon dry with paper towels.
- If you have one large piece that is very thick, you may cut it in half crosswise to make two more equal smaller fillets (this helps the cure penetrate evenly). Leave the skin on.
- In a bowl, combine the salt, sugar, crushed peppercorns, and crushed juniper berries.
- Mix well to create the curing mixture.
- Lay out a large piece of plastic wrap.
- Spread half of the salt-sugar cure mixture on the center of the plastic wrap.
- Place one half of the dill fronds on top of the cure mix.
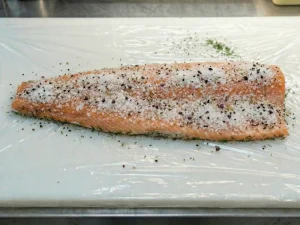
- Place the salmon fillet(s) on the bed of dill and cure (skin side down if one piece).
- Pour the gin evenly over the salmon flesh, letting it soak in.
- Then spread the remaining salt-sugar mixture on top of the salmon, covering it thoroughly.
- Lay the rest of the dill fronds over the fish.
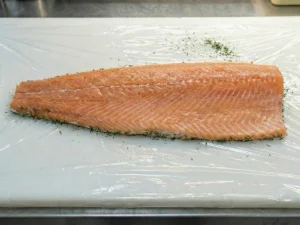
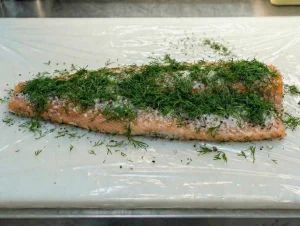
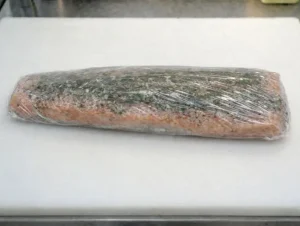
- Tightly wrap the salmon in the plastic wrap, making sure the cure and dill are pressed against all sides of the fish.
- Place the wrapped salmon in a rimmed dish or baking pan (to catch any leaks).
- Set a weight on top – for example, a cast-iron skillet, a brick wrapped in foil, or a couple of canned goods.
- This pressing helps firm up the gravlax.
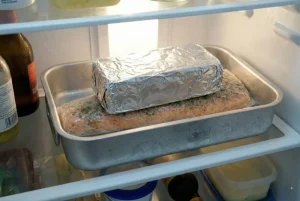
- Refrigerate the weighted salmon for 48 hours (2 days). For a lighter cure, you can do 24–36 hours; for a very firm, “hard” cure, go up to 72 hours.
- Flip the package every 12–24 hours so the fish cures evenly in its brine.
- You’ll notice liquid pooling; that’s normal as the salt draws out moisture.
- Optionally, once per day you can briefly open the wrap and sprinkle an extra tablespoon of gin over the fish for extra flavor, then rewrap.
- After the curing time is complete, remove the salmon from the fridge.
- Unwrap it and discard the dill and curing spices.
- Rinse the salmon under cold running water to wash off the salt/sugar brine. (If you did a mid-cure re-wrap and there isn’t much clinging cure, you can simply wipe the salmon with a damp cloth instead of rinsing, to preserve a bit more flavor – up to you.)
- Pat the salmon very dry with paper towels.
- Place the gravlax skin-side down on a cutting board.
- Using a very sharp long knife, slice the salmon thinly.
- For traditional gravlax slices, hold your knife at a shallow angle and cut long, thin slices away from your body, almost parallel to the cutting board.
- Aim for slices about 1/8-inch thick or even thinner.
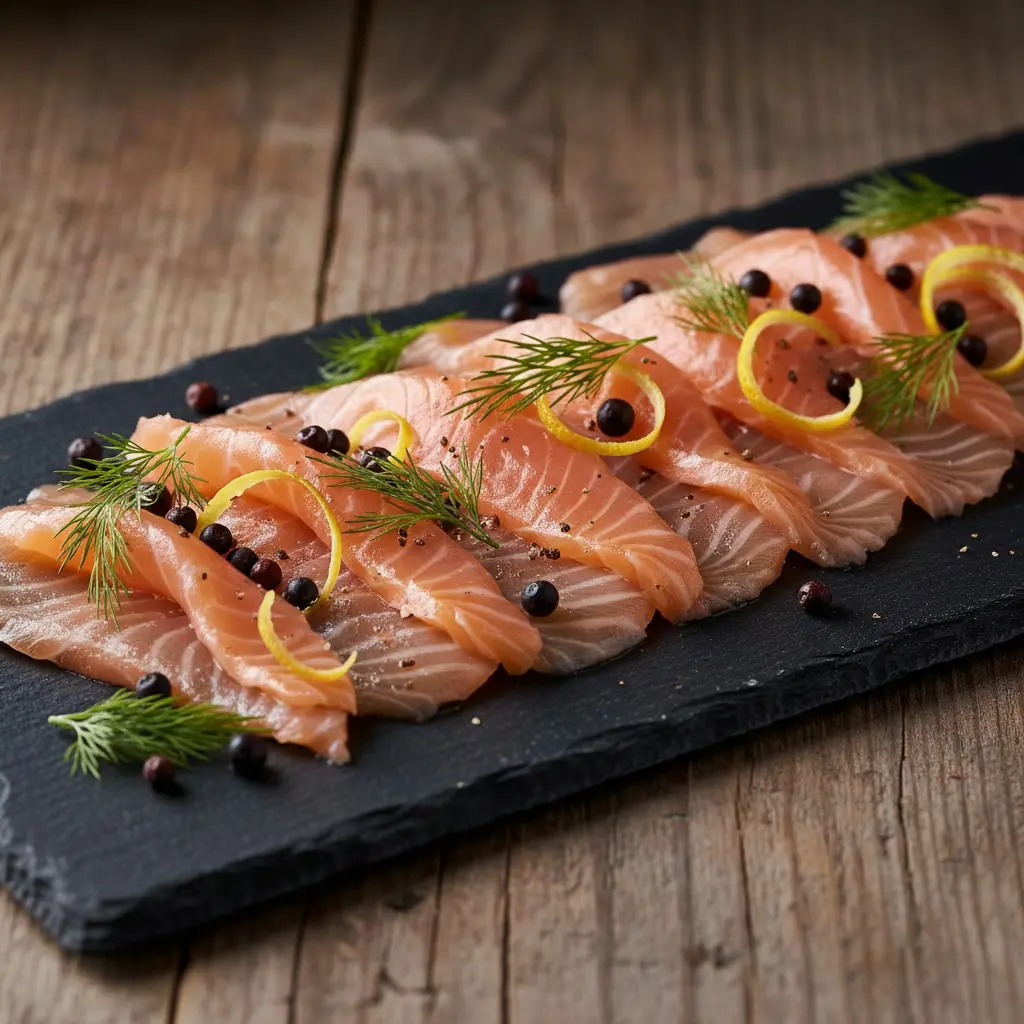
- The slices will have a translucent orange-pink hue.
- You can slice off and discard the thin grayish surface layer on the very outside if it’s extra salty.
- Arrange the slices on a platter or plate.
- Serve chilled or at cool room temperature with your choice of accompaniments.
Notes
- Safety First: If using wild salmon that hasn’t been commercially flash-frozen, freeze it at -4 °F (-20 °C) for at least 7 days before curing to eliminate parasites.
Frequently Asked Questions (FAQ) and Troubleshooting
Use the freshest salmon you can find, ideally sashimi-grade from a trusted source. Both wild and farmed salmon can work. Many gravlax aficionados actually prefer previously frozen salmon for safety (freezing kills potential parasites). If you buy a high-quality frozen wild salmon, you can thaw it and use it for gravlax with excellent results. Just avoid any fish that’s been sitting around for too long (frozen or fresh). If using fresh wild salmon, consider freezing it yourself as noted in the recipe notes. Thick center-cut fillets from Atlantic salmon or Pacific king salmon are wonderful. Steer clear of very thin tail pieces (they can over-cure and turn too salty/dry). Trout or Arctic char can also be cured with this method if salmon isn’t available – they’re smaller, so adjust cure time down a bit.
Freezing is highly recommended if the salmon has not been commercially frozen already. While the salt and sugar cure will kill many microbes, it does not kill parasites that might be present in raw fish. The USDA and food safety experts advise freezing fish to -4 °F (-20 °C) for at least 7 days to neutralize parasites. Many home freezers are around 0 °F, which is sufficient if you freeze for a week or more. If you’re unsure of your fish’s history, it’s better to be safe: pop it in the freezer for a few days before curing. (Pro tip: You can buy frozen salmon and make gravlax whenever – a great way to enjoy wild salmon year-round.) Also, always keep the salmon cold while curing and serving to prevent any bacterial growth.
The curing time depends on the texture and flavor you prefer:
Light Cure: ~24 hours – yields a very silky, lightly cured salmon. It will taste less salty and more raw-like in the center. This is good if you want a very delicate cure, but it won’t keep as long (consume within a day or two).
Standard Cure: ~36–48 hours – this is the sweet spot for most people. The salmon will be well seasoned but not overly salty, with a firmed-up texture that still melts in your mouth. At 48 hours you’ll get nice clean slices and a balanced cure.
Hard Cure: ~72 hours (3 days) – the salmon will be quite firm, especially on the outer layers, and boldly flavored (saltier). This is “old school” gravlax style. The fish will keep a bit longer once cured this much, but if you’re sensitive to salt you may want to serve it with a sauce or on bread to temper the saltiness.
For a first time, I recommend about 2 days of curing. It’s a happy medium. Remember, thickness of the fillet matters too – a very thick fillet might benefit from the full 48 hours, whereas a thinner piece could be ready in 36. When in doubt, you can always take a tiny test slice from the thickest part after 1.5–2 days and see if it tastes cured to your liking. If it’s too raw, cure longer; if it’s plenty salty already, you can move on to the next step early.
If your finished gin gravlax is too salty for your taste, don’t despair. You can try rinsing the slices in cold water and patting dry, or even soaking the whole fillet in ice-cold water or milk for 10-15 minutes, then drying and slicing. This can gently pull out some excess salt (though it may also remove a bit of flavor). Another trick is to serve the gravlax with unsalted accompaniments: unsalted crackers or bread, whipped cream cheese, or a sweet mustard sauce – these will balance the saltiness on the palate.
To avoid over-salting next time: cure for a shorter period, or use a slightly lower ratio of salt. Also, be sure to remove the cure and rinse the fish after the curing time; don’t let it sit in the salty brine longer than intended. The optional mid-cure step of re-wrapping in fresh wrap can also prevent the outer layer from getting too salt-saturated. Finally, remember to use coarse kosher/sea salt – if you accidentally used fine salt, it could lead to over-salting because fine salt packs more densely (always use the type of salt specified). With a bit of experience, you’ll dial in the perfect cure to match your taste!
Dill is the traditional herb for gravlax and it really gives that classic Scandinavian flavor. However, if dill isn’t your thing or you want to experiment, you can absolutely customize the cure. Here are some fantastic variations:
Citrus & Herb: Omit dill and use strips of lemon zest or orange zest and maybe some thyme or tarragon in the cure. The gin + citrus combo is lovely.
Beetroot Gin Gravlax: Grate a raw beet and mix it into the salt-sugar cure (wear gloves to avoid pink hands!). The beet will stain the salmon a gorgeous ruby red on the outside and add a subtle earthy sweetness. This looks stunning for holiday presentations.
Spice it Up: Add a 1-inch piece of grated fresh ginger, a chopped red chili, and lime zest to the cure for a gravlax with a zesty Asian-fusion flair (gin might not be traditional here, but why not?). Or try crushed coriander seeds and a touch of ground fennel for a warm spice note.
Different Spirits: If you’re not using gin, you can substitute the alcohol with vodka (essentially flavor-neutral, letting the other aromatics shine), aquavit (which adds caraway and anise flavors), or even a splash of whiskey or brandy for a unique twist. Each will give a different character but the curing process remains the same. For a non-alcoholic version, you can simply omit the gin – the gravlax will still cure well with just salt and sugar. You might add a tablespoon of crushed juniper berries to mimic some of gin’s flavor, and perhaps a little lemon juice for moisture.
Part of the fun of making gravlax is that once you understand the basic technique, you can get creative with flavor profiles. Just keep the fundamental salt+sugar cure in balance to ensure the fish preserves properly.
Yes – as long as you handle it properly. Cured salmon (gravlax) is a raw preparation, but the combination of salt, sugar, and cold storage effectively “cooks” the fish in a way, by drawing out moisture and creating an environment that’s inhospitable to bacteria. That said, you must start with fresh, high-quality fish and keep everything clean. Freezing the fish beforehand is a good safety measure against parasites, and maintaining refrigeration during curing and after is critical. Once the gravlax is out on the table, treat it like you would sushi or cold smoked salmon – don’t leave it at room temp for more than a couple hours. If it ever smells off or develops an odd color, err on the side of caution and don’t consume it. But when made and stored correctly, gravlax is not only safe but absolutely delicious. It’s essentially the same concept as lox or sashimi, which many of us enjoy safely.
Also note, because we are using alcohol (gin) in the cure, it adds an extra antimicrobial boost (though not enough to skip safe handling). The salt content in the cure is quite high, which is a proven preservation method. Bottom line: follow the recipe guidelines, and you can confidently enjoy your homemade gravlax. People in Nordic countries have been eating it for centuries!
Pressing the salmon with a weight is traditional and does improve the texture. The weight helps the cure penetrate by pressing out moisture, resulting in a firmer, sliceable gravlax. If you don’t have a dedicated weight, you can use anything moderately heavy: a few cans, a foil-wrapped brick, a heavy cutting board with something on it, etc.
If you truly have nothing to use, it’s not an absolute deal-breaker – the salmon will still cure, but it might be a touch softer. In that case, you might cure a little longer to compensate. Another trick for a good press is to use a smaller dish that just fits the fish and then wedge something against the top. Vacuum-sealing the salmon (if you have a vacuum sealer) also naturally presses the cure around it and can substitute for weighting, plus it keeps things tidy.
But in general, try to weight it – your gravlax will have that dense, velvety texture like the ones from a gourmet shop.
Great question! Gravlax vs. Smoked Salmon:
Both are cured salmon products with a silky, translucent texture. The big difference is that smoked salmon is additionally smoked (exposed to wood smoke at a low temperature), which gives it a distinctive smoky flavor that gravlax doesn’t have. Gravlax is cured purely by salt/sugar (no smoke), so its flavor is all about the cure ingredients (dill, gin, etc.).
In terms of use, they’re pretty interchangeable – you can use gravlax anywhere you’d use cold-smoked salmon (bagels, canapés, etc.). Gravlax tends to be a bit sweeter due to the sugar, and often has those herbal notes.
And lox (as known in the U.S.) traditionally refers to salmon cured in brine (saltwater) and not smoked, though nowadays “lox” often implies cold-smoked salmon as well or is used interchangeably with smoked salmon on bagels.
Essentially, classic lox is closer to gravlax in that it’s not smoked, but lox (specifically “Nova lox”) is usually saltier and doesn’t include the dill/sugar cure profile of gravlax. Gravlax is a specific Scandinavian preparation with dill (and in our case gin!). All are delicious – but if you crave that aromatic dill and the subtle gin botanicals, gravlax is the way to go.
If you’ve cured the salmon for at least 2 days (medium cure or firmer), it should keep about 5 days, up to a week in the refrigerator. Keep it tightly wrapped to prevent oxidation and drying out. Remember, gravlax has no added preservatives except salt and sugar, so treat it as a fresh product.
If you did only a very light 24-hour cure, try to consume it within 2-3 days for best safety.
To freeze gravlax, yes, you can. Many people do this if making a large batch. Wrap the cured, rinsed, and dried salmon (either whole piece or pre-sliced) in plastic wrap and then foil, or vacuum-seal it. It will keep in the freezer for about 2 months without significant loss of quality (possibly up to 3 months). Thaw it slowly in the fridge overnight before using. One tip: if you freeze it unsliced, it’s often easier to slice thinly while it’s still slightly semi-frozen – the fish firms up and the knife cuts through cleanly. Do not freeze gravlax that was made from salmon that had been frozen once before (to maintain best texture and safety, stick to one freeze-thaw cycle).
Slicing gravlax is an art, but you’ll get the hang of it!
Use the sharpest long, thin-bladed knife you have (a fillet knife or carving knife works well). Chill the salmon well; cold gravlax is firmer and easier to slice than room-temp. Start at the tail end if your fillet has one, or a thinner corner. Slice across the grain of the fish at a shallow angle. Use a smooth back-and-forth motion with very gentle downward pressure – let the knife do the work.
Pro move: for those gorgeous wide, translucent slices, angle your knife about 30-45° to the top of the fillet so you’re almost slicing along the surface. As you slice, you can gently place your free hand on top of the fish to steady it (be careful!). Each slice should be thin enough to fold easily. If the slice is ragged or too thick, try again and go slower. Wipe your knife blade occasionally to remove any buildup of oils. It may take a few slices to get in the groove, but soon you’ll be producing deli-quality salmon slices. And even the less-than-perfect slices will still taste amazing, so don’t stress.
By now, you’ve got all the know-how needed to create your own gin-cured salmon gravlax, plus the confidence to customize it to your taste. This beautiful Nordic dish is an absolute showstopper – whether it’s part of a holiday smörgåsbord, a Sunday brunch spread, or an elegant appetizer platter. With its subtle gin botanicals, it’s a fun twist on tradition that will intrigue and delight taste buds. And perhaps the best part is the sense of wonder you’ll get each time you unveil that cured salmon after days of anticipation, and slice off a piece to taste – it’s no less than kitchen alchemy.
Enjoy your gin gravlax!