
Few holiday aromas are as comforting as a ham quietly brining in the cold pantry or simmering away on the stove before Christmas. In my childhood home, the julskinka was an eagerly awaited centerpiece – a symbol that God Jul (Merry Christmas) was finally here.
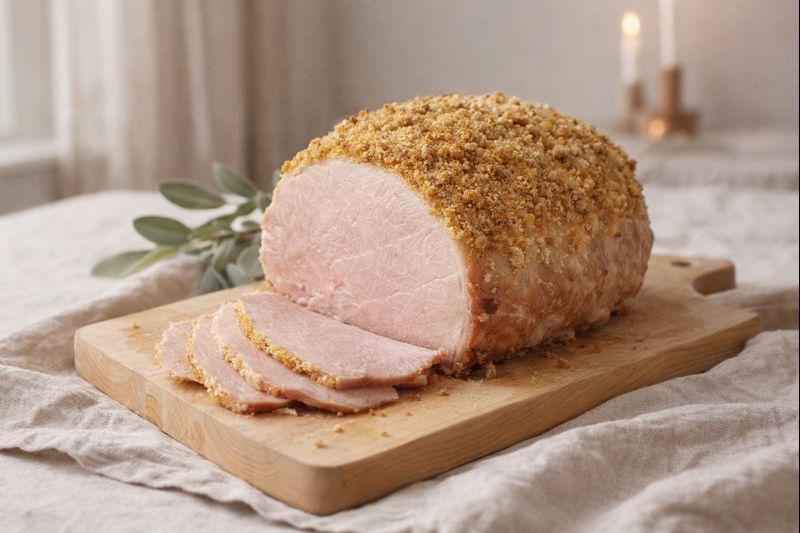
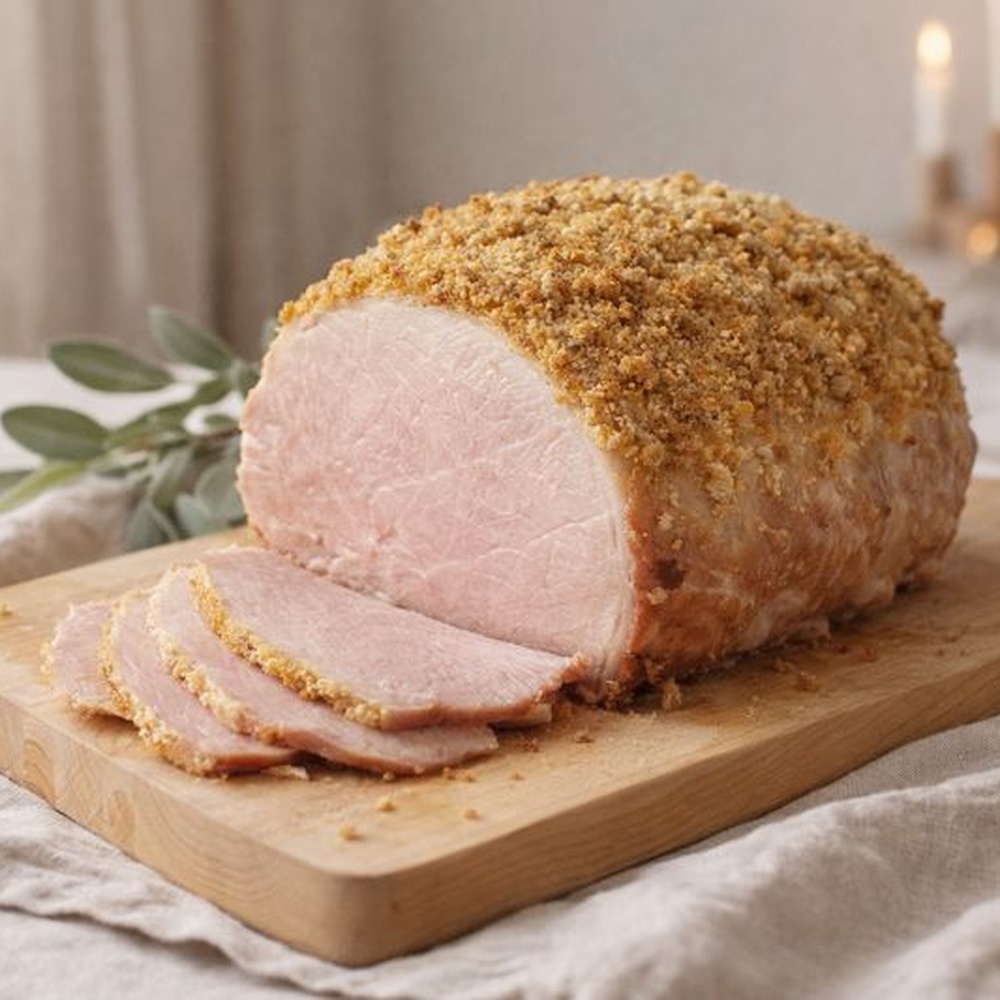
This Swedish Christmas ham is unlike the glazed hams some might know; instead of a sugary glaze studded with cloves, it wears a savory coat of mustard and breadcrumbs called a griljering. The result is a beautiful, golden crust that adds flavor and texture to the tender ham beneath. And trust me, the hardest part of making julskinka is waiting to dig in – in Sweden, sneaking a paper-thin slice of ham as “quality control” before the dinner is practically a tradition (some say that first taste, fresh from the oven, is second only to seeing family during the holidays!
In this guide, we’ll walk through how to choose the right cut of pork for your julskinka, how to cure it (with either a wet brine or a dry rub, or a bit of both) and cook it to juicy perfection, and how to achieve that classic mustard breadcrumb crust.
We’ll also cover what to do with the drippings or cooking broth (including a beloved Swedish tradition of dipping bread in the ham broth). This is a true how-to for making julskinka at home – from brine to bake to smörgåsbord. Along the way, we’ll sprinkle in a little history and serving suggestions, so you know not only the how but the why behind this cherished Scandinavian dish.
So put on a pot of glögg and let’s get started! By the end, your kitchen will smell like a Swedish Christmas, and you’ll have a magnificent festive ham to prove it.
Choosing the Right Ham for Julskinka
What cut to use: Julskinka is made from the hind leg of the pig – essentially a fresh ham. You’ll want an uncooked, uncured ham (often called a “green” ham) weighing around 8 to 12 pounds (3.5–5.5 kg). Both bone-in and boneless hams work:
- Bone-in: A whole or half leg with the bone still in tends to have more flavor and tradition on its side. The bone helps insulate the meat and can make for a juicier result, plus you get a nice soup bone for later. Just note it will take a bit longer to cook through the center.
- Boneless: Easier to carve and fits more easily in typical pots and pans. Boneless hams are usually sold tightly netted to hold their shape. They brine and cook a little faster, but can dry out slightly quicker if overcooked.
Skin and fat: For best results, choose a ham that still has its thick skin (rind) and a good layer of fat on it. The skin and fat cap will protect the meat during cooking, keeping it moist.
If your ham comes skinless, don’t worry – just make sure there’s a layer of fat and reduce the cooking time a bit. (If there is skin, we’ll be removing it after cooking and you can even turn it into crispy crackling. In Scandinavia, that crispy rind is often served as an extra treat on the side)
Fresh vs. pre-cured: Traditionally, Swedish Christmas ham is salt-cured but unsmoked. If you can find a fresh unsmoked ham, that’s ideal – we’ll be doing the curing ourselves with salt and spices. Some European markets or specialty stores (and even IKEA’s food section) stock uncooked, cured hams around the holidays. Those have already been brined, so you can skip straight to cooking if you get one – just be sure to rinse it to remove excess salt.
If your only option is a smoked ham, you can still use it for julskinka (it will have a different flavor but still be tasty). In that case, soak the ham in cold water for a few hours to mellow the saltiness, and proceed with cooking and the mustard crust.
Size considerations: A 10-pound (4.5 kg) ham can feed about 15–20 people as part of a buffet with other dishes, or about 8–10 people if it’s the main course. If your gathering is smaller, you can certainly use a half ham or smaller piece – just adjust brining and cooking times accordingly (and enjoy the leftovers!).
Remember, julskinka is often served cold and keeps well for several days, so erring on the side of extra ham isn’t a bad idea.
Curing the Ham: Wet Brine vs. Dry Brine
Salting the ham is an essential step that gives julskinka its proper flavor and succulent texture. In the old days, this process started weeks before Christmas. Farmers would pack the ham in salt (often with a bit of saltpeter for that rosy color) and let it cure in a cold cellar, then soak it in a brine barrel for another week or more.
Today, we have refrigerators and a bit less patience – but we can still choose between a wet brine or a dry cure (or a combination of both) to prepare our ham.
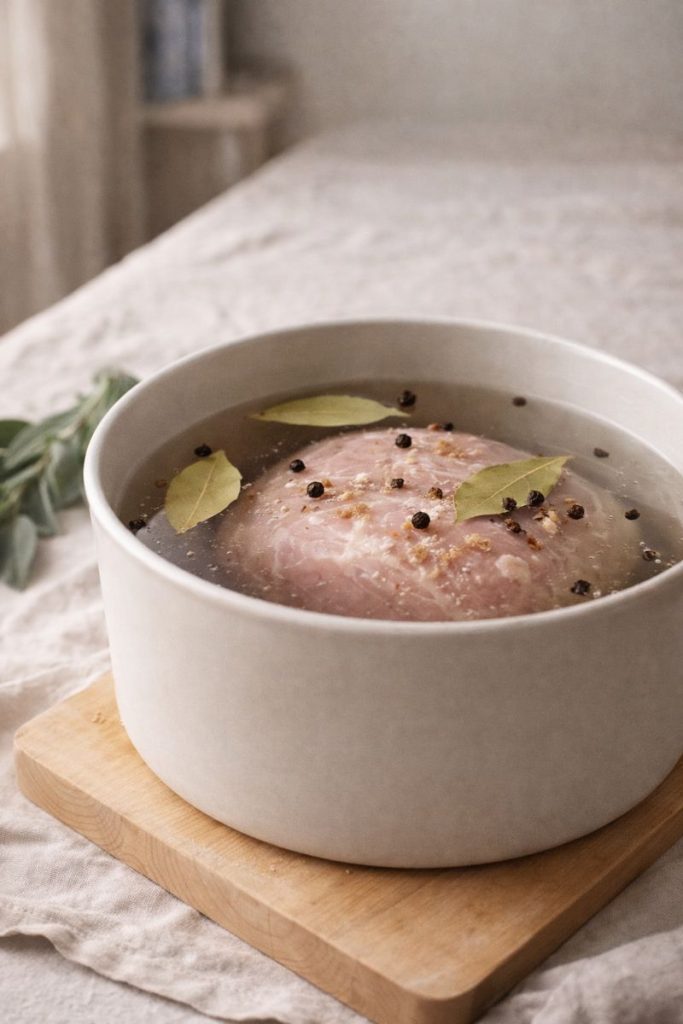
Wet Brining (Traditional Soaking Method)
A wet brine means submerging the ham in a seasoned salt solution for several days. This is the more traditional method in Sweden, and it yields a reliably juicy ham with gentle seasoning throughout.
Dry Brining (Salt Rub Method)
Dry brining (or dry curing) is the simpler-but-slower method: you rub the meat all over with salt (and usually a touch of sugar and spices) and let it cure in its own juices. This method was often used in times before large brine containers were practical, or as a first step in traditional curing.
You can dry cure the ham on its own, or even do it before wet brining for a one-two punch of tradition (as was done historically).
Which method to choose?
Wet brining is a bit more foolproof for a juicy ham and allows you to flavor the brine, but it requires space for a big container. Dry brining takes longer to penetrate and demands some fridge real estate too (and you need to deal with the salty liquid it draws out), but it’s less messy and uses no extra water.
For most home cooks, I’d recommend wet brining for this particular project, as it’s closer to how modern Swedish julskinka is prepared. If you’re curing the ham well in advance, you can even do a hybrid: a couple of days of dry rub followed by a 5-day wet brine.
No matter which route you take, your ham is now cured and ready for the next step: cooking!
Cooking the Ham: Boil or Bake?
Once the ham is cured, the hard part is done. Now it’s time to cook it through. The goal is a ham that is fully cooked, tender and juicy, but not falling apart – so you can slice it nicely.
There are two primary ways to cook a julskinka: simmering in water (boiling) or roasting in the oven. Both can yield excellent results, and each has its advantages:
Boiling (Traditional Method):
The classic Swedish way to cook julskinka is to gently boil it in a large pot of water. This method is great for keeping the ham moist and flavorful, and it gives you the bonus of a wonderful broth for dopp i grytan (more on that soon).
Oven Roasting
Roasting is more akin to how an American holiday ham is cooked (minus the sweet glaze). It’s convenient if you don’t have a pot big enough or prefer not to deal with boiling.
The key to roasting a brined ham is to go low and slow, and perhaps with a bit of steam to prevent drying.
Tip:
Whether you boil or bake, don’t throw out the ham skin (if it had one). After cooking, carefully peel off the rind. You can trim off excess fat attached to it and then either snack on that soft, gelatinous skin (if that’s your thing), or lay the pieces on a baking sheet, salt them, and roast in a hot oven until they crisp up into delectable pork rinds. In Sweden this crispy skin, called svål, is often treasured as an indulgence
The Mustard–Breadcrumb Crust (Griljering)
The hallmark of julskinka is its beautiful mustard and breadcrumb crust. This layer is added after the ham is cooked. In Swedish, to apply this topping and bake it is called griljera – essentially to broil or grill.
The crust not only adds a tangy, savory flavor and an appealing golden color, but it also gives a delightful texture contrast: a slight crunch to each bite of ham.
Making Use of the Drippings: “Dopp i Grytan”
One delightful custom associated with Swedish Christmas ham is dopp i grytan, which translates to “dipping in the pot.” This isn’t a gravy in the French sense, but rather the seasoned broth from boiling the ham, kept hot and used as a dip for bread. After all, when you’ve gone through all this trouble to create a spiced ham stock, why waste it?
If you boiled your ham, you’ll have a pot of fragrant, salty ham broth infused with spice. Strain this liquid to remove any bits, and skim off the excess fat floating on top. Keep the broth warm on the stove.
During the Christmas meal, set out a bowl or pot of this hot broth and encourage your guests to dunk pieces of hearty bread (rye bread, sourdough, or Swedish vörtbröd – the spiced malt bread) into it. The bread soaks up the savory broth – it’s like a rustic au jus. This is the original way Swedes “used the drippings” from the ham, and it’s wonderfully cozy.
In many families, dopp i grytan is done earlier in the day on Christmas Eve, often at lunchtime, almost as a light warm-up meal before the big julbord feast later. Everyone grabs a mug of the broth or a bowl, dips bread, maybe adds a swipe of mustard – it’s comfort food at its simplest. The tradition dates back to frugal olden times when nothing edible was wasted; today it’s done for nostalgia and the delicious taste.
If you roasted your ham and didn’t have a boiling pot, you won’t have as much liquid, but you can create a small dipping sauce from the pan drippings.
Here’s how: after removing the ham from the roasting pan, pour off most of the clear fat, leaving the browned juices. Place the pan over two burners (or transfer drippings to a saucepan) and add a couple cups of water (or unsalted stock). Bring it to a simmer and scrape up any browned bits. You can toss in a bay leaf or a spoonful of mustard to echo the ham’s flavors. Simmer for a few minutes, then strain.
It won’t be as rich as the boiling broth, but it will do for some dipping in the pot. Alternatively, you can fortify it: simmer the deglazed drippings with a chopped carrot, onion, a few peppercorns and a small smoked ham hock if you have one, to make a quick broth.
Of course, if dipping bread in ham broth isn’t your thing, you could repurpose that broth into soups or split pea soup base for after the holidays. But I highly recommend trying a round of dopp i grytan with your family – it’s fun and really tasty, a direct connection to Swedish Christmases of long ago.
Serving Julskinka
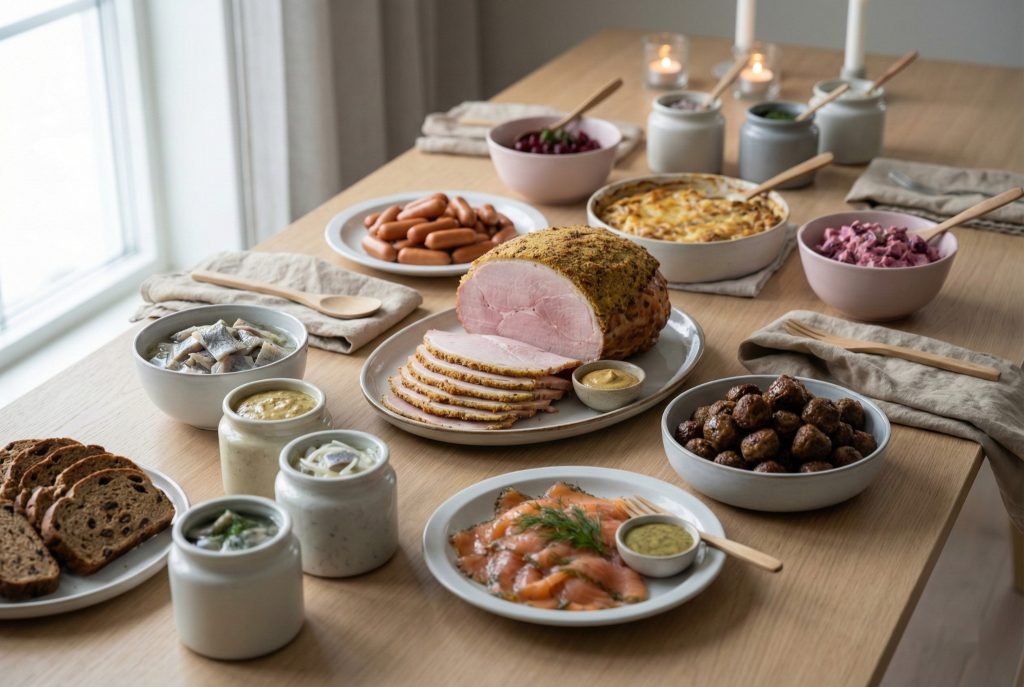
Julskinka is traditionally served cold or room temperature, thinly sliced, as part of the julbord (Christmas buffet) on Christmas Eve. But it’s also perfectly acceptable to serve it warm, especially for a smaller sit-down dinner. Here are some serving tips and ideas:
On the Julbord:
If you’re doing a Scandinavian-style Christmas smörgåsbord, present the ham on a platter or cutting board. Often it’s brought out whole and then sliced as needed. Swedes will often decorate the platter with a few leaves of kale or greenery, perhaps some prunes or an apple for a pop of color (an echo of old traditions when a pig’s head or ham might be garnished with an apple in its mouth).
Provide a jar or dish of good homemade mustard on the side – this is non-negotiable! Swedes love a dab of mustard on their ham slice. A coarse-grain sweet mustard or the drippings-based mustard sauce (made by mixing some of that ham broth with mustard and perhaps a bit of cream) are common. There’s even a product called julskinkesås (ham sauce) that’s basically a mustardy gravy served with ham, but plain mustard does the job for most.
Also, set out some thin crispbread (knäckebröd) or fresh rye bread and beet salad (rödbetssallad). The creamy beet and apple salad is a classic Swedish side that pairs brilliantly with the salty ham – often ham and beet salad end up together on a piece of bread as an open-faced sandwich.
On the julbord, you’ll typically also have meatballs, prinskorv (little sausages), Jansson’s Temptation (potato anchovy gratin) and more, but the ham proudly holds center court, “presented in its entirety and then sliced and eaten cold, often with a dollop of mustard”.
As a main course:
If you plan to serve the ham as a warm main dish (say, on Christmas Day dinner), you can treat it much like any roast ham. Carve thicker slices and serve with potatoes, Brussels sprouts, or your favorite sides.
In Sweden, it’s not uncommon to have warm julskinka with boiled potatoes and creamed kale or red cabbage. Just remember the flavor profile of this ham is more understated (savory, a touch smoky if your ham was smoked, and mustardy) rather than sugary, so it goes well with hearty, earthy sides.
A spoonful of lingonberry jam alongside can act as a Swedish substitute for cranberry sauce, giving a tart-sweet counterpoint.
Leftovers (if you have any!):
The beauty of julskinka is that leftovers are arguably just as treasured as the main event. One classic next-day preparation is ham on rye crispbread for breakfast. Simply take a piece of knäckebröd, butter it, lay on a few slices of the cold ham, and top with a bit of Swedish mustard or even some of that beet salad.
This open-faced sandwich (smörgås) is unbelievably good with a cup of coffee on Christmas morning. You can also dice up leftover ham for pea soup (a Swedish Thursday tradition), use it in omelets, or layer it into a gratin.
If your ham had a bone, that bone will make a fantastic split pea soup or stock for bean soups – freeze it if you’re not using it immediately.
To glaze or not to glaze:
Actually, not to glaze – that is the answer for julskinka. We’ve done the mustard breadcrumb crust instead of the sticky sweet glaze, and that’s the way we keep it. It’s worth noting this if you’re serving to folks who might expect a honey-glazed ham – you can proudly explain that Swedish Christmas ham is never sugar-glazed with pineapples and cherries, etc. (those are more American Southern traditions).
Julskinka’s flavor is much more about the meat itself, the salt, and the mustard. Many find it a refreshing change of pace – it’s savory and versatile.
Enjoy!
Finally, gather everyone around and enjoy the fruits of your labor. Perhaps start the meal with a hearty skål! (cheers) and a small glass of aquavit if you’re doing it the Swedish way – but do warn any newcomers that tradition dictates a snapsvisa (drinking song) before each shot.
As you eat, you might share the story of julskinka: how the tradition might trace back to ancient pagan midwinter feasts with a sacrifice of a boar to the Norse god Freyr, later evolving into a Christian Christmas Eve staple once the church’s fasting rules relaxed in the 1800s. It’s amazing to think that by serving this ham, you’re connected to centuries of Nordic history – from farmhouses where the prize pig was fattened all year for this moment, to modern homes where even today 70% of Swedes admit to sneaking their julskinka taste before Christmas Eve
Julskinka – Sweden’s Festive Mustard-Crusted Christmas Ham
Ingredients
Method
- Skip this step if you plan to dry-brine instead.
- In a large pot, combine the water, salt, and sugar for the brine. Add the bay leaves, peppercorns, allspice, and juniper if using. Bring to a boil, stirring until the salt and sugar dissolve.
- Let the brine cool completely to room temperature, then stir in the optional pink curing salt (if using).
- Place the ham in a clean tub or heavy-duty brining bag and pour the brine over it, ensuring the ham is fully submerged (weigh it down with a plate if necessary)
- Cover and refrigerate for 5 to 7 days, turning the ham every day or two so it cures evenly. (If your ham is larger than 10 lbs, aim for the full week or slightly longer.)
- If not wet brining, mix the coarse salt, sugar, and ground spices (if using) in a bowl. Rub this mixture all over the ham’s surface.
- Place the ham in a large zip-top bag or non-reactive pan, cover, and refrigerate for 5 to 7 days.
- Liquid will seep out; turn the ham once a day and drain off any excess liquid if needed.
- After curing, rinse the ham well in cold water to remove surface salt.
- After brining (wet or dry), remove the ham from the fridge. If wet-brined, take the ham out of the brine solution and discard the brine. Rinse the ham thoroughly under cold running water to wash off excess salt, then pat it dry.
- Let the ham sit at room temperature for about 1 hour before cooking (this helps it cook more evenly).
- If the ham has a thick layer of skin, you can choose to leave it on for now (it helps retain moisture during cooking) and remove it after cooking.
- Place the ham in a large stockpot. Add enough cold water to cover the ham completely. Drop in the bay leaves, allspice berries, peppercorns, and the quartered onion.
- Bring the pot to a boil over high heat, then immediately reduce heat to low to maintain a gentle simmer.
- Simmer the ham, partially covered, until it is cooked through – roughly 3 to 4 hours for a 8–10 lb ham (estimate ~20 minutes per pound, but it can vary). Skim off foam from the surface occasionally.
- The ham is done when an instant-read thermometer inserted into the center (not touching bone) reads 145°F (63°C) for a just-done, juicy ham, or up to 155–160°F (68–71°C) for a very tender ham.
- Tip: If you have time, turn off the heat and let the ham cool in its broth for 30–60 minutes; this can improve juiciness.
- Carefully remove the ham from the pot and set it on a baking sheet.
- Reserve the broth for later (dipping sauce)
- Preheat your oven to 325°F (165°C).
- Place the ham fat-side up in a roasting pan.
- Pour about 2 cups of water into the pan to create steam, and tent the ham loosely with foil.
- Roast for approximately 3 to 3.5 hours (about 18–20 minutes per pound) or until the internal temperature reaches at least 145°F (63°C).
- Remove the foil for the last 30 minutes to allow the ham to brown slightly. (If using a foil-wrapped method for a boneless ham: wrap the ham entirely in aluminum foil and place in the pan; bake for ~2.5–3 hours until 145°F, then unwrap.)
- Once done, take the ham out of the oven and let it rest for 15 minutes.
- Drain the pan drippings and save them (you can use them to make a bread-dipping broth or gravy).
- Increase oven temperature to 450°F (230°C) in preparation for the crusting step.
- In a bowl, whisk together the egg yolks, mustard, and brown sugar until smooth.
- Add the salt and a pinch of ground allspice/cloves if desired.
- If the mixture is very thin, stir in 1–2 tablespoons of flour or breadcrumbs to thicken it slightly (it should be a spreadable paste that isn’t too runny).
- Line a baking sheet with foil (for easy cleanup) and place the cooked ham on it.
- (If the ham has skin/rind, peel it off now and trim excess fat to leave about a 1/4-inch layer.)
- Brush or spread the mustard-egg mixture all over the top and sides of the ham evenly.
- Next, sprinkle the dry breadcrumbs over the ham, pressing gently so they adhere to the mustard layer.
- Use the full amount to form a nice coating – the ham should be covered in pale, mustard-dampened breadcrumbs.
- Put the breadcrumb-coated ham into the 450°F (230°C) oven.
- Bake for about 10–15 minutes until the breadcrumb crust is golden brown.
- Keep a close eye to prevent burning – the crust should toast up and turn deep golden, but if you see very dark spots forming early, you can lower the oven temp a bit or shorten the time.
- You can also turn on the broiler for the last 1–2 minutes for extra color, but watch constantly.
- Remove the beautiful, crusted ham from the oven.
- Let it cool for at least 20–30 minutes (for warm serving) or completely to room temperature if you plan to serve it the traditional way (cold). Cooling helps the crust set and juices redistribute.
- To serve Swedish-style, cut thin slices and serve cold or at room temp with mustard on the side. For a meal, you can carve thicker warm slices.
- Enjoy!
Notes
Final thoughts
Julskinka truly embodies the spirit of a Scandinavian Christmas: it’s humble yet celebratory, steeped in tradition but perfectly at home in a modern kitchen. And most importantly, it’s made to be shared. God Jul och smaklig måltid! (Merry Christmas and enjoy your meal!)